Using the local storage

OK, so lets the local browser storage in our component.

Edit the minicart.js to have a code like

https://gist.github.com/marjan7790/286d4e052b39200e9d646d352eb5c599

Re-deploy if you must and observe the Local Storage – it should have a new key there named cartExtra, just like on this picture

cartExtra-storage

Well, since you’ve come this far, congratulations, you are a very good developer, and I’m sure you do not need any further explanations about the code 🙂

Feel free to checkout the source code from tag 0.4.0

Thank you for reading.

Passing customer data to the Minicart

In a previous article, How Magento passes server data to minicart.js, we saw how Magento will use the general window object to pass server data, and later in article Pass our own server data to the Minicart we saw how to pass data via the <script type=”text/x-magento-init”>.

But, where exactly is the customer data, like, the cart items, coming from?

I will start looking at the original minicart.js, as set in the module-checkout and reffered to quite a lot so far. This is a good entry point

https://gist.github.com/marjan7790/eed6ae2be8382a7695a28f721af46d8f

First to notice, var items is acquired from this.getCartParam() function which is defined as

https://gist.github.com/marjan7790/635c97c21314894066f21cc5df123e0b

which means that there is internal property named cart, that among other keys, contains the items key as well.

Indeed, we can see this is a “class level” attribute and is defined as an empty object like cart: {}.

Lets take a look at initialize() again, specifically at

https://gist.github.com/marjan7790/b98c8aaa8b06f0c74b7953a8dde5bdf5

And then this leads to the update() function

https://gist.github.com/marjan7790/6323a8ef5cc7dec662a637be46fa2f88

OK, it is now clear that the update() function does add keys and assigns values to the this.cart, and that as an input parameter it uses: customerData.get(‘cart’);

And what is customerData? Well, lets look at the define section of this RequireJs module and notice that this is another module, defined originally in Magento_Customer/js/customer-data and loaded in this minicart.js

What this means? This minicart.js is dependent on another module, and that module on its own is responsible to provide the data. The minicart.js methods are merely reading this and re-distributing in its own properties (this.cart) in the way that will be most convenient to do the display of the data.

So, we are coming to the an important notice here: minicart.js is within the web/js/view folder of the module-checkout. Please notice that there are /web/js/action and web/js/model folders as well.
This all means, there are .js modules that will be focusing on modeling (defining the essence of the js object) or taking actions only (like collecting and submitting data from and to the server), and sure enough, there are .js modules, just like our minicart.js that will be used for the rendering part of this whole idea.

You see, the web/js folder is now a complicated mini JS application in itself. Slightly of topic here, but each Magento module, may have its own JS application embedded with its /web folder. Just keep this in mind. This well may be the future of the Web, not just Magento: any reusable headless back-end component (module, bundle) may come with at least one default front-end implementation, i.e. the default head.

Anyway, the question of how the minicart.js gets its data from the server, has now transposed into how Magento_Customer/js/customer-data gets its data?

Open

https://gist.github.com/marjan7790/b9e501134d74af084cf0fadf8c347ad4

First thing to notice this js file returns a js object like return customerData;

Containing other function and objects as well as few plain old listeners ($(document).on()), the essence of this file is to produce and return the customerData variable, which means whoever claims that they depend on the customer-data.js, they will get this customerData object.

So, what to focus to? Its not easy to know what to look at, so it is always a good practice to set a couple of break points here and there and see when they get to be executed in the js stack.

But, by habit almost, lets start at the init() function. I lead you to focus on this code

https://gist.github.com/marjan7790/43e9be18d9fb25f37983c7578a7e8585

There are there different sections and the get their data from dataProvider.getFromStorage().

And dataProvider is defined in this same file, above the customerData object. Looking at the getFromStorage definition we see

https://gist.github.com/marjan7790/cf539aeff59a5a43c7eba3b65297e588

The last ingredient here is to notice that storage is defined even further above in this file like:

https://gist.github.com/marjan7790/8db46baca3599a9a004928fd8ec75b38

Suffice it to say the browser’s local storage is a mechanism for storing data on a browser level and applications can use this for storing variables that are going to be used between two requests (remember HTTP being stateless?). For more info, please google and find more suitable articles.

Anyway, Magento has set its own storage key named ‘mage-cache-storage‘ and you can observe this is you were to load any magento frontend page and the inspect then , in Chrome -> Application -> Local storage, or in Mozilla -> Storage -> Local Storage.

There are of course other keys, but lets focus on the ‘cart’ one. It looks something like

cart-from-storage

So, this is how some of the server data is available to the js scripts. Perhaps in another article in the future I will tackle the topic of how this cart section of the mage-cache-storage gets set in the first place, but you do not have to go far to see how this might be done. Search, within customer-data.js, the update() function and you should find this implementation

https://gist.github.com/marjan7790/5f34944dd438d5a294c022d098b57f95

I leave it up to you how all of this flows. For this you could set a debug point, perhaps before the _.each function. Remove an item from the cart and this code will be triggered, but regardless of how complicated it might look, updating the storage boils down to storage.set(your-section, your-section-data);

After this I hope you have a nicer understanding how data is passed from the server and used by the frontend JS scripts. And again, “scripts” here is a sort of diminishment, since, all of the front scripts, as pointed earlier are specializing and contributing to somewhat larger – they product front head that nicely correlates to the back-end.

In the last article of this series, lets write some simple code to use the local browser storage capacity ourselves.

Thank you for reading.

Override the Minicart

So far I have altered some of the behavior of the Minicart using mixins. This usually means adding more properties and behavior to an already present functionality. With mixins, the properties and behavior of two different objects are merged and you end up enhancing your object in a way that is not possible via classical inheritance principles.

This given, deciding how many items can be shown in a given moment is not mixing up properties, since, well, the maxItemsToDisplay has always been there, I just updated its value. This is practically overriding and I’ve used mixins for it.

In this article here we will be overriding the minicart component. Lets get started.

I assume you are the 0.2.0 version of the program. If you have loaded perhaps the home page of your application (or any other page except the checkout) and have added one break-point at this line

https://gist.github.com/marjan7790/7693e5aed1d9d053d6d46bbbe25a84a1

you will see the data behind the component may look like

myobj-after-super-mixins

In the case of the screenshot, the component is: “Magento_Checkout/js/view/minicart”.

So, lets do a couple of file system changes. First, change view/frontend/requirejs-config.js content to

https://gist.github.com/marjan7790/e1eddbae663c6bad7ec726136fc4f4da

OK, so, this code practically says we do not need requirejs-config.js at all!

But, I thought you might want to keep the old code commented out just as a reminder to the mixins syntax, and if you would keep the file, well, it needs to have var config in it. An empty one, but, has to have it.

If you do not want to keep the old mixins config, simply remove the file.

Next, edit the minicart.js to look like

https://gist.github.com/marjan7790/2d6dd7bd0bfc37b2412e847766cf2754

In the define, a dependency is added to the original minicart and that compoenent is now internally here referred to as Minicart. We extend it and return it with return Minicart.extend({.

The rest of the code, you have noticed, especially the initialize() function, is exactly the same!

We can’t stop here. This component won’t be loaded. There is an .xml file that dictates the js loading. In our case the original file is

https://gist.github.com/marjan7790/e10b6aef3f6674555da55c0abd839abe

so, we need to override it. Create default.xml file inside view/frontend/layout in your module with the following content

https://gist.github.com/marjan7790/ee7ee850e1642d4bb96f8d6017b026a0

Find that line where the compoent is specified and edit Vendor_Yourmodule accordingly to your module.

So, re-deploy static content, clear magento cache and browser cache and you are done!

Set a brake point just like earlier and notice that the minicart component name is not the default one!

As one extra thing, we can deploy our own .html template file. First create file content.html inside view/frontend/web/template/ folder of your extension with this content

https://gist.github.com/marjan7790/f9360e831f7af1f36d3f34dad4411c46

This is basically the original file, but I have added one single line

https://gist.github.com/marjan7790/4b45b98905b1229997b4286b7ff24196

Since new .html file is used, make sure that the default.xml specifies your file instead of the default one. Do this over here

https://gist.github.com/marjan7790/fe5f415ef37f85911346859f0d0e7075

Once you are done, a mere magento cache flush should sufice it, and you should see the Maximum items to display 1 message at the top of the minicart container.

You can always check the code from the 0.3.0 tag for comparison.


Notes and Conclusion

Note:

<span text=”some-js-variable-here” /> that is added to the content.html is NOT available by default Knockout.

Something like

<span data-bind=”text: maxItemsToDisplay”>

is probably the normal Knockout syntax.

Magento has simply taken Knockout a step further adding one more layer of abstraction here. By not clearly listing all of these specifics, Magento does make these things one level harder for the community.

Anyway, we have now the mini-cart overridden.

As a summary, to achieve this
– we don’t need to create requirejs-config.js at all to override a js component
– we do need to override a native layout .xml file
– we could specify our own .html template

Addressing finally the elephant in the room: initialize() is completely the same both in using the mixins and the override approach. Well, we are anyway returning some-object.extend(), and it is the same object, we merely use different references for it. And in both cases our code executes before the original initialize() does. So, naturally, the code stays the same.

This last one can be very instructive: if the code from version 0.3.0 is claimed to be a better solution to the requirements, it is only because it satisfied and acknowledges the well established classical idea/concept of overriding. It does not work better, and you’ve already tackled a default.xml file which you did not had to do it 0.2.0.

Thus, almost always ask yourself: is an established concept always worth applying?

I’d hate to leave you with such philosophical questions, so, lets continue and extend this series and take a look at the question: where the data is really coming from.


Pass our own server data to the Minicart

From the previous post how server side data is being passed to the Minicart, you remember that Magento uses window.checkout object to configure the original minicart.js component. And I had an idea to modify the window.checkout object inside minicart.phtml, which seems rather straightforward and nice.

While this is all practical, lets try to figure out a way to pass data to our component in a way that the value is actually a property of the component.

If you are not the type that likes too much experiments, I promise, this is that type of article that has high chances of giving a headache, so, now is the moment to go back to your favorite series :). For the rest of you, lets start playing around with Magento by opening

https://gist.github.com/marjan7790/d6331447c83d420014d22c4a05a30ca2

and take a look at this code more carefully

https://gist.github.com/marjan7790/36fe1702a71ab2bc710eeea5c57ac983

In essence, this says:

Pass a JSON object to Magento_Ui/js/core/app

Practically, Magento_Ui/js/core/app is alias to app.js, which is found in vendor/magento/module-ui/view/base/web/js/core/app.js, and serves to create the UI components instances according to the configuration of the JSON using uiLayout.
(original text from: https://devdocs.magento.com/guides/v2.2/ui_comp_guide/concepts/ui_comp_config_flow_concept.html)

Next, lets see where this $block->getJsLayout() code comes from.
Well, at the top of the minicart.phtml, we can see

https://gist.github.com/marjan7790/8986394570f50f45ed01c1965535ffc0

but in the mentioned class there is no getJsLayout() method. Tracking through inheritance, gives us this chain

https://gist.github.com/marjan7790/05091cc53bd9d7621fd4615f8ad5c587

and inside the AbstractBlock we can see

https://gist.github.com/marjan7790/c568048be3528a3f3968b1f8593f543e

If we were to setup a break point over here, we will see that $this->jsLayout is a mere PHP array that will be turned into json object, the content of which looks like

p2

OK, since app.js serves to create instances according to configuration, and there is “config” key in this array, lets try to add data to the config.

Go ahead and create etc/di.xml with the following content

https://gist.github.com/marjan7790/69107f04517ec70acee169db6a5a1f30

and inside the Block/Cart folder, create the class Sidebar.js with

https://gist.github.com/marjan7790/3c096f592258023039d36165f8139772

If effect, I’ve set new key named maxItems with the config sub-array of the minicart_content component.

You probably need to re-compile so the server end actually considers using your block instead of the original, and you might need to re deploy the static content to get the .js changes.

Eventually, you will re-run the page and right click on the browser and “View Page Source”.  Search within the source for

[data-block='minicart']

and you will see what gets send to Magento_Ui/js/core/app.

I’ve copied the JSON that is passed and send it to https://jsoneditoronline.org/, so I have a nice tree like representation which helps visualize things. Thus, the JSON object looks like

p3

Great, the new key is there. But, how do we use it?

Replacing in minicart.js,
maxItemsToDisplay: 3

with
maxItemsToDisplay: origMiniCart.maxItems

does not work.

Well, if you make the code to be like

https://gist.github.com/marjan7790/65f89a8153dc04fdcc58c8e1a51d3550

and set a break point at var tmp = origMiniCart; you will see that that tmp is actually uiClass constructor, which in essence means we still do not actually have our object. Remember, from previous tutorial, the original initialize() has not executed yet.

If we don’t have an object, then, lets just create one! Update the code to be like

https://gist.github.com/marjan7790/6899d704c38328dee78a80cdfda94b17

Now, this works! But … why exactly?

It is important to know that you could send anything to your component in the config key and surely it will be available as property to your object. For example, lets say you have something like this in your .phtml

https://gist.github.com/marjan7790/acb101eb0e892e0f24df638dc653dbd9

With this code

  • You have declared that your component is named mycomponentname
  • have told that the actual js file is Vendor_YourModule/js/mycomponent
  • have told what the .html template is Vendor_YourModule/mycomponenttemplate
  • set a component title
  • added a new config property named valueToPass

If you have your component instantiated at some point you should be able to call
    mycomponentname.valueToPass
and this will return 55.

But, the origMiniCart is still merely a constructor function, so, this is exactly what we remedy against.

Lets dig in the original minicart.js initialize() function. It surely does first its own specific things, but eventually returns

https://gist.github.com/marjan7790/9874b3376536db681de15f53a33b41ad

Well, lets track this and figure who is the parent of this component?

It actually says return Component.extend({ …,

and if we scroll up in the “define” section of this RequireJs module, we will see that Component is alias for uiComponent and actually refers to Magento_Ui/js/lib/core/collection.

If you wonder where this alias comes from, open

https://gist.github.com/marjan7790/1acc044a4743851fa34f8be279a4b058

But anyways, opening Magento_Ui/js/lib/core/collection we see returns Element.extend({ and here Element is actually alias to uiElement, which (again from requirejs-config.js) is alias to Magento_Ui/js/lib/core/element/element.

Element is where for the first time we will see initialize() method that actually returns return this;, and not return this._super(); as wee saw in minicart.js.

So, uiElement is as far as the hierarchy goes. Therefore, if we typed in our initialize() something like

https://gist.github.com/marjan7790/7693e5aed1d9d053d6d46bbbe25a84a1

we will eventually force uiElement to return an actual object.

After that, its easier. We simple refer to the new property maxItems and assign it to the actual property that the original script uses, which is maxItemsToDisplay.

Finally, we return the parent object.

Check the 0.2.0 version of the module.


Conclusion

This article showed how to send new properties to a given component by passing customized json to app.js that added to the config array. Please keep in mind, that with this example, the new maxItems property is set to the original minicart component first. And this is all done in place after server side PHP has executed.

However, on the client end, at the moment of applying the mixins, I have instantiated an actual original minicart object, read from it the new property and updated an existing one. Not the most natural thing to do, but after this I hope you get a sense of what could potentially work as a way to pass server side data.

In the next article, we will continue to do an actual override of the component.

Thank you for reading.

Add website filter to product export

Today I will be focusing to extend the export product functionality by adding a website filter.

This original functionality can be seen by visiting the administrator’s:

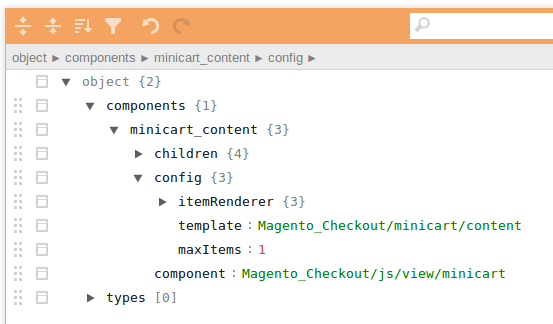
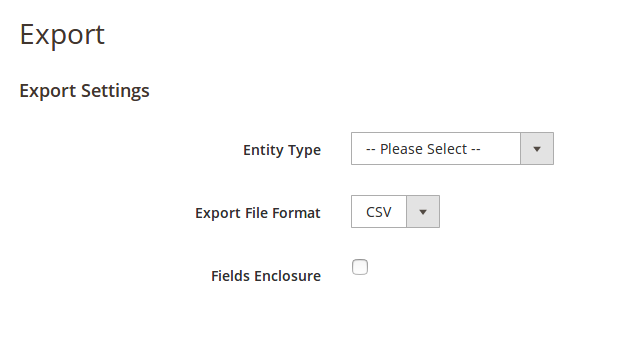
System -> Data Transfer -> Export

p1

Assuming you have a basic module already set (out of scope of this article),
adding a website filter can be achieved, in theory, by going through these two steps:

  • Override the form to have a select option of website ids
  • Override the model that actually prepares the collection whose data will be send to a .csv file

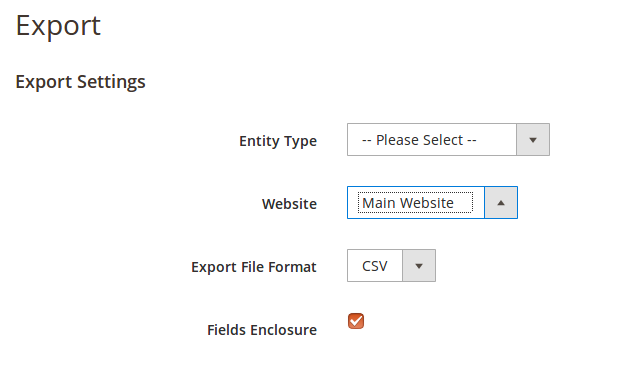
Eventually, we will have this look available

p2


First we need to add new field to the field set.

The original field set is created in

https://gist.github.com/marjan7790/06a22fe29355acd192c5907eddb99e30

For those of you who wonder why this is the class that we need, consider these following hints:

  • the admin url is /admin/export/ which to file system will translate into Controller/Adminhtml/Export/Index.php
  • given the controller path, the layout handle on filesystem will translate into view/adminhtml/layout/adminhtml_export_index.xml
  • there should not be too many files named adminhtml_export_index.xml in a default Magento module that may have “import” or “export” as part of its name

Anyway, the _prepareForm() should be overridden by adding

https://gist.github.com/marjan7790/52c963d0c7e9e24531d119164aeea1ef

We will start by telling Magento that we have preference over the original form. We will do this in etc/ di.xml by adding

https://gist.github.com/marjan7790/c3e64a2e86b3429391bf7253ae3700c7

Now lets create our file Form.php and add the _prepareForm() method as

https://gist.github.com/marjan7790/b7d120725382dbc31a5afdc9232f1490

However, we still need a protected property $websiteFactory
and we also need to override the __construct method so we can get an instance from the Website Factory object.

So, add this code in your class

https://gist.github.com/marjan7790/fc0e849f832357945615cb82868f9599

You might need to re-compile after this. After that, lets reopen our page and you should see the website selector.


Now, for “Entity Type” select “Products”, for “Website” the website of your choice and lets inspect the “Continue” button. You will notice that it leads to a link like admin/export/export.

This given, lets try to capture the website id selection in Magento\ImportExport\Controller\Adminhtml\Export\Export. Directly in this file (and you will revert code to original later ) add these lines inside the execute() method like

https://gist.github.com/marjan7790/3f828641a48bee2bdeddb42ad680733f

Then, set a break point and execute. You will notice:

$post becomes an array that has these keys: “form_key”, “frontend_label”, “attribute_code” and “export_filter” which is array on its own, 82 members long.
$params becomes an array that has the same keys $post has plus: “entity”, “file_format”, “fields_enclosure”.

Hey, this is good. We see in the $params that collected value from the FORM elements. But, sadly, not our “website_id”.
What gives?

Open, the layout handle adminhtml_export_index.xml in view/adminhtml/layout and look for this line

https://gist.github.com/marjan7790/1d659a55fab191466a51272d030264ff

Ok, that given, lets open file before.phtml, located in view/adminhtml/templates/export/form. This file extends the VarienExport.prototype by adding at least a couple of methods, out of which, interesting for us is

https://gist.github.com/marjan7790/4351fd28608371703201b5b8c6ae7889

right after which there is something like varienExport = new VarienExport();

This varienExport JS object is actually called on change on the “Entity Type” selection. Go back to the Form.php and notice the onchange value.

But, what about the larger picture? Magento uses RequireJs to load a component and execute it immediatelly. And all of this is done inside a .phtml file?
Magento certainly can find a way to surprise me. One should always try to be both aware of such subtleties and to simultaneously stay sane 🙂

Anyways, knowing this, we need to override the before.phtml now. Create new file adminhtml_export_index.xml inside view/adminhtml/layout and add this content

https://gist.github.com/marjan7790/2b6aabba3c7281a4da52321fa1003b5c

Later, create before.phtml inside view/adminhtml/templates and add this content

https://gist.github.com/marjan7790/4ad063bc41e1b59668565ddfd1a255de

I have the full code practically copied over just to add one small change inside getFile()

https://gist.github.com/marjan7790/fd8f6b41df9941f525737639c29bd86f

I don’t like this. Dear reader, please suggest an improvement?

Anyway, lets continue and again, for “Entity Type” select “Products”, for “Website” the website of your choice and lets click the “Continue” button. Sure enough, now we have a website_id inside the $params array. And, you can revert to the original code now and, for clarity, clear any break points.

Lets now continue to override the model that fetches the data.


With all said earlier, open Magento\ImportExport\Controller\Adminhtml\Export\Export and focus on this code

https://gist.github.com/marjan7790/ee04a8b841897c319ccd5ce63c6c2ba3

$model is of type \Magento\ImportExport\Model\Export and after this line

https://gist.github.com/marjan7790/f90678d8c8578462bc8034a288dd8f87

the protected property _data will have encapsulated whatever came from the getParams() from the Request object.

For those of you who wonder what happens here, the chain of inheritance is
\Magento\ImportExport\Model\Export extends \Magento\ImportExport\Model\AbstractModel extends \Magento\Framework\DataObject, and the last one, DataObject, produces the setData() method.

Back to what the controller does

https://gist.github.com/marjan7790/0a6008c7987908795c1a0a3312dc2aa3

So, we turn our attention to $model->export(). Open class Magento\ImportExport\Model\Export and you will see within the export()

https://gist.github.com/marjan7790/a418a0ef04146a53fa2c716abb4a1f5f

This line actually calls the export() method from Magento\CatalogImportExport\Model\Export\Product and within there is something like

https://gist.github.com/marjan7790/3488f1615889c437314b19b0685e7770

Now, we could override at two places

a. accept website_id

https://gist.github.com/marjan7790/37a77f22ce00e173ed83c572922e7996

b. add website filter

https://gist.github.com/marjan7790/1b47ec68a4fab007e258cbe028fa3347

Now, that should do it. So lets go ahead and edit etc/di.xml and add

https://gist.github.com/marjan7790/15b079ad2947dd47567593a839a9d538

And create the following files with the content from below

https://gist.github.com/marjan7790/ea6c314fba3d8ad8a554e62bfc72f988

and

https://gist.github.com/marjan7790/a93b070ae92166953807e13441b93c9f

Recompile if you must, but I guess this should do it.

Eventually, you can pick up the source code from

https://github.com/marjan7790/datatransfer

Finally, you are encouraged on your own to continue add an option to download data from all websites at once, as the original function was.  Notice, we don’t have such option now.


Conclusion

Adding new behavior to some admin functionality in this case meant

  • overriding the Form class
  • overriding .phtml file that executes RequireJS module
    for this step we needed to add our own layout handle, i.e. orverride how the handle works, and, we needed to override the RequireJS module
  • overriding two Models from two different modules that would do the actual data export

Usually, one might expect to even override a Controller class, but there it goes, we went into overriding RequireJS module.
Regardless, keep in mind that it will be unlikely to achieve any similar requirements without overriding at least one Block and one Model class, whichever they are.

Thank you for reading.

How Magento passes server data to minicart.js

If you have ever build some admin grids that would list some entity data, you may have come across Data Sources. Magento recognizes the need to have a separate “channel” to be able to pass any server data into the java script objects and uses this Data Sources heavily in the admin section.

But, at the end of the day, its java script and if you want to make a variable available, you could always add it to the window object and all other js objects will have access to it.
Not ideal, but practical for sure!

In fact this is how its done in the original code:

https://gist.github.com/marjan7790/fba5c72f16a118cc66f60d7cc1fd67f2

Where is the checkout object set? Lets try common sense again! 🙂

It should be part of the checkout module, and it would be probably in a .pthml file. So, ask your favorite IDE to search in the vendor/magento/module-checkout folder for phrases like “window.checkout =”. Restrict this to a .pthml files only for faster processing.

Your IDE should find a match in

https://gist.github.com/marjan7790/d6331447c83d420014d22c4a05a30ca2

The code looks like

https://gist.github.com/marjan7790/b6c7b2fcb8bfadfd3121ac77a6899acf

Yes, the $block has a method that creates a checkout object, which among other properties, has the maxItemsToDisplay set as well.

By the way, if you were to debug, eventually you will figure the maxItemsToDisplay gets to be populated from the configuration value from

Configuration -> Sales -> Checkout (Common sense, remember?) -> Shopping cart Sidebar -> Maximum number of items to display

But regardless of that, you should by now have an idea how to edit this if needed. There can be many ways like:

  • override the block by adding new method like getMySerializedConfig() and call that method in an overridden minicart.phtml file
  • override the minicart.phtml by adding a new like

https://gist.github.com/marjan7790/004041751ed52cd46cf449899d1b31f5

There are various possibilities, it really depends on the needs, but, eventually, we will need to focus on passing values directly to the <script type=”text/x-magento-init”>, or in particular, extending this code:

https://gist.github.com/marjan7790/eadbdbe6a8e23dd7b95eea7de1fa80ff

The next article tries to pass our own server data to the Minicart.

Applying mixins to the minicart.js

Keeping in mind what has been done before, lets now do it right.

You will notice that editing the number of items to display is within this section of code

        return Component.extend({});

In fact, how things are set, maxItemsToDisplay is a property of this component.

On a contrary, this code

https://gist.github.com/marjan7790/9b8096668cb4a31e9a47ef1b5e733159

is not part of the Component object, but is well within the main anonymous function. This may not seem like an important thing, but actually, the way it is set leads to one important consequence:

This code is plain old jquery and not being part of the component means, that it sits there, loaded in the browser and listens for any direct clicks/taps.

This in particular means, it both gets executed as much as times there is a click/tap on the proper HTML element and has NO correlation/dependency on any other java script object that is already loaded. It just does a simple work on its own.

To confirm this, place a break-point in the original minicart.js and see how the execution is paused in the debugger every time you click to open the Mini cart.

Clear any earlier breakpoints and now place a break-point on this line

var self = this,

which is right within

https://gist.github.com/marjan7790/5cd955f5c20c8c51844c4d9f048195b9

and you will see that no matter what you do or click, the initialize function gets executed once and on page load.

Now keep this in mind, while we try to change the behavior of the Mini Cart component by applying mixins to it. (I’m assuming you already have created and enabled a module of yours, which is out of scope of this article.)

We will go through these two steps:

First, in you extension’s folder view/frontend add file requirejs-config.js with this content

https://gist.github.com/marjan7790/941eb1805171159d700fa2583358dcf0

And second, create the file minicart.js under the view/frontend/web/js folder of your extension, with this content

https://gist.github.com/marjan7790/49bbca41222c12f5f69d9e10169bb9ea

Re-deploy static content if you must, clear cache and voila, you are done!

What happened?

In requirejs-config.js, as the file name itself suggests, we have added configuration to requirejs, telling it to do something like:

RequireJs, there is a module under this path ‘Magento_Checkout/js/view/minicart’.
Would you please, find my new file under this path YourVendor_YourModule/js/minicart and apply mixins to it?

Mixins? Suffice it to say, there are two JS objects and you want to merge their properties and functions. Well, the idea behind is multiple inheritance and JS certainly makes this possible.
At the end of the operation, when mixins are applied, new object emerges that has the combined properties of both of the objects. This is not something that you can achieve with plain old Object Oriented Programming.
I have said this in a oversimplified manner, and some of you may want to continue elsewhere to gather more details about how mixins work.

OK, that given, our code, that it is supposed to be merged with the original minicart.js is

https://gist.github.com/marjan7790/69ca73c54b8754f9e2c36c00defec7e4

See, Magento has implemented RequireJs in a way that you are kindly getting a reference to the target object. I have named that object origMiniCart.

We might want to thank Underscore.js for the possibility to call origMiniCart.extend({}), but it is clear that with this we can properly override the component properties in a good way.

I have set maxItemsToDisplay: 3 and returned the extended component.


The code so far was solving requirement B: display only 3 items.

You will notice that the code that addresses requirement A  has nothing to with the component and it is mere jquery

https://gist.github.com/marjan7790/7dd23978ef049b1f91459d5add8cf786

Please notice that

https://gist.github.com/marjan7790/3f5b8a16fc17aea51b4b25267b1003b3

does NOT contain the initSidebar() call. The call to initSidebar() stays as is in the original minicart.js

Now, lets debug:

add a break-point at localBody.css(‘overflow’,’hidden’); in your minicart.js and one at initSidebar() in the original minicart.js

Click to show the Mini Cart.

You will notice that first the debugger stops in the overridden file , executing to hide the overflow, and only then moves to execute the initSidebar() in the original.

Now, lets clear any breakpoints for clarity and add new ones.
One at return origMiniCart.extend({ in your minicart.js and one at var self = this, within the initialize() method in the original minicart.js

When you reload the page, you will notice the same order of execution: first your code is executed, and then the execution moves to the original initialize().

For those that you have come this far, one last info.

Open file

https://gist.github.com/marjan7790/572c2cebff58aeda7caace08a90fb4c5

Locate this code

https://gist.github.com/marjan7790/88828f3ed71c55a0b2c01935974c579f

The comment above the function is sufficient enough to figure that the value to be modified, i.e. the original component is referred to as the “target”. After the modification the “target” will be returned.

Feel free to check the git repository for tag 0.1.0: https://github.com/marjan7790/minicart

Thank you for coming this far.

In the next article we will talk about parameters passing. Since this maxItemsToDisplay: 3 is a bit … hardcoded, no? 🙂

Locating and Editing minicart.js

How do you locate the component? There are many ways, but lets try to use both common sense and common tools.

In Google Chrome, just like mentioned earlier, in any Magento page (except the checkout), right click in your browser and then click “Inspect”. Then move to the “Sources” tab.
For those of you who prefer Firefox, right click in your browser and then click “Inspect Element”. Then move to the “Debugger” tab.

Now, in the left sidebar we see all available sources, and we will continue to focus on the pub/static folder.
Continue to open this path: /pub/static/frontend/[vendor]/[theme]/[locale].
This usually resolves to: /pub/static/frontend/magento/luma/en_US. (And yes, /pub may not be there is your web server is pointing to the /pub folder directly.)

But, moving back to the important issue. What’s next?
Well, common sense says that if the cart itself is part of the Magento Checkout module, perhaps the Mini Cart is too.

So, we continue to try and open folder Magento_Checkout/js and then we see it is very easy to spot /view/minicart.js. This is our component!

So far, we were looking at the deployed file in the /static folder, but now it is not hard to locate the actual source file:

https://gist.github.com/marjan7790/6999f2ad14af620b49143a47d5d0e73c
Now, lets solve the problem in a bad way.

Find this code

https://gist.github.com/marjan7790/9b8096668cb4a31e9a47ef1b5e733159

and change it to

https://gist.github.com/marjan7790/f6d49ea064af25765ac1b8e5763eac0a

Tip: if you’ve edited the file in the /vendor folder, you might need to re-deploy the static content. This given, changing the file directly in /static folder, may be more practical for trial and error approach like this.

Eventually, reload the page and click on the mini cart icon. It works! The window scroll on the right of the window is gone.

However, if we now close the mini cart, the scroll is still gone.

So, add this code

https://gist.github.com/marjan7790/2b51050947e15f1b5cebeece92454903

below the code that you edited earlier (but above return Component.extend({)

There, done.

Now, move a bit down and spot this line

https://gist.github.com/marjan7790/7aed17b35d43850040e748f2eeb9e931

change it to

https://gist.github.com/marjan7790/1cb374a40be8bd05e1384f4ea7764694

Re-deploy and clean cache if you must. But there, you are done! Take a brake now 🙂

Next, we will apply mixins to the original minicart component.

Repository Interfaces

The Repository interfaces are a sub-type of the Service interfaces.

Suppose you have an object of type Magento\Catalog\Model\Product to which, as usual, can call the save() method. This either creates new product or updates an existing one.

https://gist.github.com/marjan7790/c2eae95a18d82f4ecc7738e70a2c07cf

In Magento 2, there is another way to save a product by using an instance from Magento\Catalog\Model\ProductRepository like

https://gist.github.com/marjan7790/ad996e02280faae659947230576c528d

What happens here?

Well, instead of calling the save() method on the Magento\Catalog\Model\Product object itself, we pass this object to the save() method of an object of type Magento\Catalog\Model\ProductRepository.

So, what is the difference?


Let us first see, what happens if you use the save() method directly on a product model like

https://gist.github.com/marjan7790/c2eae95a18d82f4ecc7738e70a2c07cf

The model class itself is Magento\Catalog\Model\Product

Within, search for the definition of the save() method.

None found right? Well, there’s beforeSave() and afterSave(), but not save() itself.

Interesting…

Thus, we need to turn our attention to the parent classes of Magento\Catalog\Model\Product.

We need to pass through Magento\Catalog\Model\AbstractModel and Magento\Framework\Model\AbstractExtensibleModel, just to finally arrive at Magento\Framework\Model\AbstractModel.

Sure enough, there is a save() method here and it looks something like

https://gist.github.com/marjan7790/eedc8bf5de69e042c58e409d138e5f5b

We see now, whenerver save() is called on any model, the actual method comes from this AbstractModel, and the implementation is that the RESOURCE MODEL actually does the saving.

This last one is not surprising given that we’ve been always, since like from the beggining of time in Magento 1.0, creating both a Model and a Resource model for just about any entity.


Now, lets take a look at how the ProductRepository works.

Lets open file

https://gist.github.com/marjan7790/75447e3365349fc90d08bd3015a90122

This interface demands that there is a save() method, among other methods.

Who is actually implementing this interface? Lets open file /etc/di.xml and check line 10

https://gist.github.com/marjan7790/91a239f07e44ee326efb5682c9be4870

So, we can check the implementation of the save() method inside

https://gist.github.com/marjan7790/c1785b49970b6d8d677d07c1d66c8472

and it starts on line 444, looking something like

https://gist.github.com/marjan7790/b1177f20a84ec36c52250a6e38679240

This method expects a $product object of type \Magento\Catalog\Api\Data\ProductInterface passed, but by default this resolves to Magento\Catalog\Model\Product.

Looking down below on line 500, within a try statement, we see something like

https://gist.github.com/marjan7790/71257c9886e4ece4c1c8d2b042e4d2ca
You guessed well! $this->resourceModel is of type \Magento\Catalog\Model\ResourceModel\Product, declared as protected property on line 77.

So, again, the RESOURCE MODEL actually does the saving.


But now we can spot the difference. Specifically, in the following code.

https://gist.github.com/marjan7790/30c7dc10204c9225d05164378edd52ff

All the code executed here, indeed, eventually may and will lead to differences in behavior between direct model save and this repository way of saving.

For example the product repository will get and process product links if the ignore_links_flag is set to 0, check if this is existing product in the first place etc.


Conclusion

Magento 2 has added yet another layer of abstraction towards working with models. With the downside of having a more complicated code for debugging, comes a positive moment where the model object is managed by yet another object, rather than directly instructed to do the things we like it to do. Often, these things are not there by default.

So, we probably need to conclude that if any need in the future to change how the product is saved, perhaps the better way to do it is by overriding the product repository instead of the product model.

The same goes for saving and updating products. I would prefer to use the product repository object over the product model object.

Thank you for reading this article!

Â